Showing posts with label crafting. Show all posts

20160713

Shear Echo Six


I finished knitting this beanie way back in May, but I’ve been so busy with these new jobs that my content output essentially ceased to a halt. One of these jobs took up all my photography/post-processing time, and the other was simply a necessary supplement to the meager wages of the first. I seriously need a real job so I can quit all this stupidity.

Anyway: Shear Echo Six. Despite an earlier claim I made about this being the first of my works to feature a non-recycled yarn, I should point out that a few beanies in the Divide Series were made with a vintage Caron wool yarn I found en masse at the flea market for one dollar per skein. Now that I think about it, vintage finds like that seem more consistent with my production ethos than paying fifteen dollars a skein in a boutique retail setting. I recycle yarn because I’m poor, but I’m not going to stop you from calling me “eco-friendly.”

Aside from the yarn (Ariosa by Classic Elite), this is the same pattern as Echo Three. There’s angularity and all that jazz you’ve come know me by, including a scathing absence of a buyable knitting pattern. I should also mention that this item is personal work, and not for sale.

I’d write up a long-winded blog post about technique and how much I love this yarn, but somehow I think I’d be preaching to the choir. All you woolheads know Classic Elite, and where those folks are now. Besides, I have to get ready for work. There’s retail slave wages to be made, and I’ve got bills. If any of you know of any opportunities for a weirdo like me, hit me up. In the mean time, you’ll have to settle for this Instagram re-cap.


20160509

These Fragile Things


I’ve been pretty stingy about sharing all the batiks I’ve collected (and inherited) over the years. Somehow I feel like I’m oversharing. You see, these textiles mark a very specific time in my life, and in the life of my mother. She was the one who acquired them all, either by my request, or her whim. When she died, I claimed as many of them that I could find. There were many more than what I ended up with. I remember specific ikats that are just lost or unaccounted for. I don’t know if I can explain in words how that makes me feel. But then that would be oversharing, according to me, right?


So this bandanna is another salvage project from one of the batik tablecloths that my mother didn’t take very good care of. Let me back up: my family hail from the island of Guam. If you’ve ever been to the South Pacific region, you’d know about the intense humidity that hits you like a wall once you step off the plane. That humidity also affects many other things like computers, and stereos, and well, fabric. So this increased moisture ultimately affects the stability of cottons, especially in this case where the table cloth is in contact with the edges of a table, hence the rips.


After cutting them out, I looked at what I could do with the fabric, and since I made a long scarf out of the last one, I decided to cut a bandanna out of it. There’s not really much to it. I spent more time measuring, cutting and ironing than actual hand sewing. My penchant for whip stitching is present here, another characteristic technique I learned from my mom. She showed me how to hem pants when I was young, so it was the first stitch I ever learned.


I suppose it’s something of an overreaction on my part to say that sharing these textiles is oversharing. I know. I guess what I’m trying to say is that the meaningfulness of these fragile things is paramount in my thoughts, and that working with them gives me a very private sense of accomplishment and emotion. It is in these projects that I feel I’m truly accomplishing more than what my polished photography can express.


20160301

Balance


One of the issues I ran into with the first recycled denim tote I made was the lack of rigidity in it’s structure. Visually, I like how it turned out, but I felt it was too floppy. There’s this balance that needs to happen between structure and weight that I’m sure a lot of architects would be familiar with. The thinner and lighter the material, the less stress it can withstand. Another secondary issue involved balancing the relationship between aesthetics and function. More embellishment means more weight and structure, but consequently it also means the bag itself will be heavier.

That first bag went in the direction of lightness, with minimal patchwork and embellishment. But with this one, I pushed a little further into a heavier composition of patchwork that wouldn’t be so floppy. There are of course other ways of approaching the structure issue such as adding thin interior pockets for paper/card stock inserts, or even using starch. My interest in raw denim lead me to that starching idea, I should try it some time.

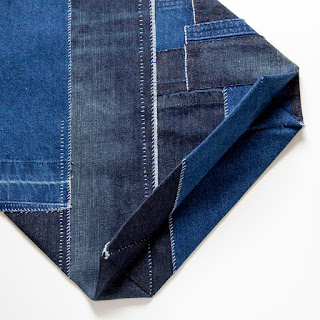
Looking at various constructions for tote bags lead me to the conclusion that the structure is achieved in two parts. The first is the folded over stage in which the strip(s) of material are formed into a flat, enclosed shape. In the second stage, the bottom is pleated to achieve a three dimensional form. From a design perspective, this was quite liberating. Regardless of how you achieve that first flat stage, the pleating of the second stage will always add structure. So I took a cue from Japanese design, specifically from sakabukuro bags which consist of long strips of fabric, spiral seamed into these fantastic diagonal forms. Some of you may remember I’ve used this technique before on a woven scarf called Delete C.


There was a good amount of measurement I had to do before hand, but it all worked out, and my math proved to be sound. Basically what I needed was a long strip of fabric, and I happened to have a composition that fit the exact width in my calculations. As the weeks went by, that length of patchwork denim grew longer until I had reached the required length.


This particular spiral seam consists of an alignment between the center point of the fabric and the center point of the hypotenuse of a 45 degree fold. The fabric is then folded perpendicularly to the hypotenuse until it runs out at the top. I had been working overlapping seams during the patchwork process, so I employed them here on the spiral seam as well. This altered my calculations a bit, but not by much. The hypotenuse of the initial fold then had to be pleated to make the flat ‘foot’ of the bag. I did this on the inside, sewing down the resulting right triangles to get those nice sharp corners.


By the time I got to the handles, I was basically winging it. I didn’t have a plan to deal with those peaks at the top of the bag. Initially, I just wanted to conceal them by folding them inward. Playing with that idea a bit, I decided to fold them in only half way, leaving a nice angular opening on either sides of the folds, but also doubling the fabric where the handles would be sewn in.


When it comes down to it, yes. This tote is more rigid than the last one I made, so in that regard, the goal has been met. I think I can push it further, but the issue isn’t necessarily with the structure, it's with the materials. Denim—especially recycled denim—is broken in, and inherently floppy. That’s it’s charm, but also it’s disqualifier. If I truly want to create rigid structure, what I need to be working with is leather. A patchwork sakabukuro style leather tote. Wouldn’t that be awesome?

Fiber Credits:
Darker denim: Old Navy
Lighter denim: Kikwear
Navy thread: Banana Republic
White thread: Façonnable

20151231

Pure


The most asked question—and I’m sure other makers get this, too—is “How long did it take you to make this?” I suppose it’s one of those things people are accustomed to asking, like saying “I’m sorry” at funerals or something. The fact is that the length of time it takes to make something doesn’t really tell you anything. The Work says everything.

So let’s just get this out of the way: This weaving project (I’ve been calling it “Pure”) took me six months to complete. That doesn’t mean I was working on this non-stop, it just means that from start to finish it took that long. See? That information doesn’t mean JACK. During the time this was on my loom, I started, completed and sold numerous knitting projects, recycled sweaters, etcetera, you get the idea.


There really isn’t anything all that complex going on in my weaving. I’m still pretty new to the craft, so composition is what I’m really focusing on. I look at the visual elements, and how colors interact with each other to define that composition. That’s pretty much it. In technical terms, this is a plain weave with a few color alternations.

The scale of a piece is something I like to explore in all mediums. Generally, I lean towards light fabrics comprised of finer yarns. Since the sett is so high, minute changes become sharp breaks in the composition. The thin pinstripe wefting is an example of that. I’ve taken these elements a bit further by leaving the ends attached and dangling off the selvedge.

Aside from the straight-forward contrasts and high sett, there are some quadruple strand wefted sections near the center that are barely noticeable. Eventually, these sections will differentiate themselves with their stability while the lighter broadcloth wefts wrinkle around them (or maybe not, who knows).


Overall, the composition consists of an unstoppable deluge of this cool charcoal that borders a desaturated navy, with light gray selvedge that comes in full force at the very end of the weave. This kind of basic two block/two color looks great in monochromes. I like how the charcoal color comes off as blue. I like that it’s faded. You can’t get that kind of ambiguous desaturation very often. Maybe that’s why I like faded blacks and grays so much. They’re ambiguous, and difficult to define.

The yarns:
Cool Charcoal
Recycled from a Gap sweater.
Light Gray Main Color and Light Gray Alternating Wefts section
The armband sections of another Gap sweater I recycled, as well as the seaming thread used on the armbands which was slightly different in color.
Warm Charcoal Block Wefts
The last remaining yardage of the yarn lot.

20151028

To Remember


Something I don’t share very often is my modest collection of batik textiles. They date back to a short span of years between the late eighties, and early nineties. I know this because they belonged to my mother, and that was the timeframe in which she visited Bali and Java. I guess I don’t share these pieces because I’m reluctant to chop them up. That’s pretty much what I’m doing most of the time: I dismantle things, and make new things out of the pieces.


This particular batik fabric was once an oval table cloth. After my mother died, I asked my father to send me her Balinese textiles, and this tablecloth was one of them. Mom liked these things as much as I do, but apparently she was never good at taking care of them. The damage indicated that it was left on the table for a really long time until the table corners ripped through the fabric. I figured this was a good opportunity as any to harvest this fabric, and make something new.

I like long scarves. I’m sure many of you know that by now. Most of the pieces I’ve designed have been in the range of eight to ten feet. Visually, I’m drawn to this aesthetic. I like thinner, finer fabrics with lot’s of area. If I want it thicker, I can wrap it around twice or even three times.


All together there are six pieces in this patchwork, seamed together with running stitches, then triple whip stitched. There was a lot of ironing and measuring involved. You may have noticed that I leave the raw edges. I like them. In time they will fray, but the whip stitching holds things in place. Something else I did was orient the folds of the seams so that verticals sat on one side, and horizontals sat on the other. Again, this was just me celebrating those raw edges. All together, this piece measures 20in (50cm) wide by 108in (274cm) long.

I never saw this table cloth on the kitchen table in our house on Guam. I wasn’t living on the island anymore at that point, I was here in California. But this piece let’s me be there on that hot little island in the Pacific. There were plants everywhere, and a beach down the street, and humidity that would eat your table linens alive.


20151019

Take the Time


I think a common misconception about my photography is that I make tutorials. Although these photo essays can be seen that way, that's not really my intention. What I'm doing is sharing my creative process in order to help you develop yours. Explicitly telling you step by step how to make something doesn't really help you do that. And let's face it: creative people don't really need to be told how to do anything. They just need to see that it can be done.

I've had quite a few of these small drawstring bags over the years, but I didn't start really using them until I started knitting. These smaller sizes have come in handy the most since I tend to knit hats. They also come in handy when I need to make room in my backpack. I keep a lightweight jacket in there, and if I need the room, I can stuff it into one of these and clip it somewhere.


The basic design is based on common plastic bags which are banned here in San Jose. The bottom consists of an accordion fold that is sealed together on the sides so that it can open and stand upright. The rigidity of this recycled denim paired with the small size allows this bag to do that whether it is empty or full.


Once again I've used this natural white mercerized cotton recycled from a Façonnable sweater. This is the same thread I split down from a triple strand yarn, and used to make my apron and a tote bag. I've doubled it up to seal the drawstring tunnel, and along the side seams where all the structural strength is needed. The whip stitching was done in single strand to keep the edges as smooth and flush to the fabric as possible. I might add to them later. I like that visual variance between the single and double threading. Maybe that's something I can take into the next recycled denim project.


In the Internet Age, we don't need all that step-by-step. We don't need patterns that tell us what to do. Technical craftsmanship is fully searchable now. There's no reason to get hung up on that. Just focus on what you want to make, and just make it. That journey of figuring things out is part of your individual creative process. Take the time to embrace it.


20150912

Fragments


I don't want to rename this project despite how much I hate the name "Fragments." In part I don't care about names at this point. This was a preliminary exercise at best, a way for me to begin looking at the compositional elements and techniques I wanted to employ. It's a rough draft of what would later become Delete Charlie. However, once all those ideas migrated over to that project, I just put this away, and forgot about it. Then other projects took over, and Fragments was just a pair of handwoven textiles sitting around taking up precious space.

So one of those compositional techniques I wanted to use was this idea of seaming. I really latched onto this idea because it effectively opened up the canvas, but also because there was this sense of randomness which later leads to opportunities for improvisation.


I don't have much control while wefting colors together in a handwoven textile. Keeping a count, and making measurements is all I can do. It's more of a prediction than anything. I'm okay with that. Visually, I want all the weft variations to occur in the middle, and the ends to be as plain as possible. So long as the two pieces are reasonably different outside of that, then it'll be fine.

Once the two pieces are seamed together, there is this sense of displacement created. In effect I'm generating a visual discrepancy by merging the two, then harmonizing the visual whole with sashiko embellishment. The two pieces are already unified in color and texture, but the individual weft compositions are what essentially break the grid. Further, the differences in warp widths add more variation to the visual whole.


In addition to the visual differences, there are some physical discrepancies that occur here. The charcoal gray yarn is a two ply single strand, and the light gray is a thinner two ply that is doubled. While they appear to be the same weight, the light gray is slightly thicker, and therefore wefts itself longer. Ten rows of light gray is longer than ten rows of charcoal by about a millimeter. On long stretches of light gray, that length discrepancy becomes significant, and that is where the sashiko comes into play. By using uniform running stitches, the fabric is gathered, similar to smocking. The resulting texture is what takes this composition to another level.


In general, this piece was more about the finishing than the actual loom work. I spent more time on seaming and embellishment than weaving. As I was working on it over the past few months, I came to realize how much I liked this. The seaming, though mundane, felt strangely satisfying. The sashiko stitching became very meditative. I found myself looking forward to working on it. As I look back on all the progress I've posted to my Instagram feed about this project, I'm a bit surprised to discover that it is the single most posted project to date. I was going to post a recap of all of them, but there are just too many images. But hey, I'm sure you've all seen them already, right?

The yarns:
Charcoal gray cotton blend by DKNY
Light gray cotton blend by Old Navy
Black silk seaming thread by Banana Republic

Oh, and my loom:
Emilia 19" rigid heddle loom by Glimakra